Freelancers need to convey effective communication, which is one of the primary reasons companies hold verbal interviews in search of talent. Your inventiveness, talents, and proficiencies are nothing without the ability to inform people about them. You must effectively articulate ideas and concepts with your colleagues and superiors in remote work settings.
Poor communication skills could lead you to trouble with miscommunication and misinterpretations. You might think, “Well, you’re a freelance writer, and you can probably write emails in your sleep.” Yes and no. Yes, I’m a writer (and can probably write emails while reposed). And No, you don’t have to be a writer to make exemplary emails.
Today, I will teach you simple tips on how to sound professional in all your email interactions. This blog post will discuss appropriately setting up your email and browser for success, formal letter formats, and letter-writing principles. You’ll be wowing your clients and peers by writing simple emails in no time.
- Set Up Your Email and Browser
- Make it Simple
- Formal Letter Format
- Activating Gmail Signature
- Review Your Letter
- Conclusion
Set Up Your Email and Browser
The main goal of writing simple letters is to get your point across efficiently and effectively. To do this without excess mental load, you need the help of several tools. Before we begin, I want to inform you that writing assistants are your friends, especially if you don’t have a trained eye for grammar or extensive vocabulary.
Gmail

Follow these steps to activate email writing suggestions:
- When in Gmail, click the cog in the upper-right corner and open “See All Settings”
- Turn on the personalization features found in the General tab
- If applicable, select Save Changes at the bottom part.
I wish this were a paid ad since I love Gmail, but it’s just a genuine recommendation from one freelancer to another.
After checking your Gmail settings, proceed with Grammarly.
Grammarly
.png "how to install grammarly to chrome browser")
Formal emails wouldn’t be complete without Grammarly, a real-time intuitive artificial intelligence (AI) writing assistant. Grammarly founders created Grammarly in 2009; since then, they have over 30 million daily users. The software corrects users’ spelling and grammar while they type. Add Grammarly to your browser to improve your email writing skills.
Follow these steps to activate Grammarly on your Google Chrome browser:
- Search Grammarly on the Google Chrome extension store and select it.
- Click “Add to Chrome” then “Add extension” on the popup.
If you have different browsers, check out the Grammarly installment guide to learn how to set them up.
The best part? Gmail and Grammarly are both free.
Grammarly also offers a free month of Premium for new users.
Of course, the processes of installing Grammarly on your browser and turning on personalization in Gmail are not going to make you write better magically. Those tools will help you write faster and better, but you still need to understand the principles and formats below.
Make it Simple
Once you have mastered the formats of a letter, you can work on your composition. Use plain and simple language to get your points across because the primary purpose of a letter/email is communication, after all. You can make your emails and letters simple by not going into too much detail like the template I’m going to provide. You can put the other particulars in the attachments so the reader won’t be overwhelmed with too much information.
Here are general tips on how to write a simple letter:
- Create a brief background before anything else.
- Don’t crowd one sentence with too much information.
- Be concise and straight to the point.
- Consider your reader’s knowledge level.
- Organize your ideas appropriately.
Finally, we’re going to talk about a letter or email format.
Formal Letter Format
In this part, I will discuss the features of a formal letter and then outline which parts you need in a regular work email. The format is consistent no matter what email or letter you’re writing, so you can use this information whether you’re a student or just someone who wants to write love letters.
For this blog, I created a free Freelance Proposal Formal Letter template.
The template looks like this:
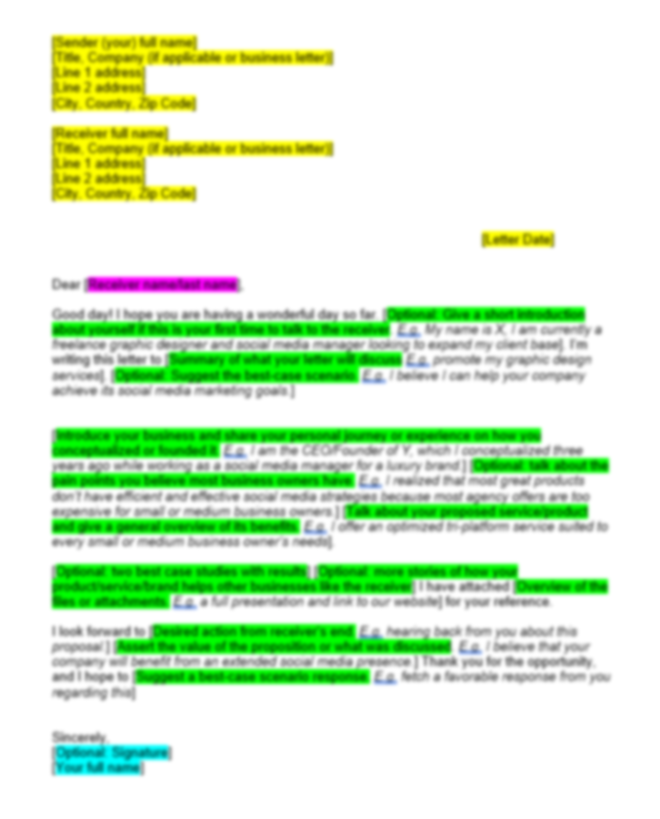
Colors:
- Yellow – Header
- Pink – Salutations
- Green – Body
- Cyan – Signatory
You can still use the format for other purposes, and the template is just a guide to show you how you should write a formal letter.
If you’re a Philippine student visa applicant, you will benefit from the following tips on how to write your Statement of Purpose or SOP for Australian or Canadian universities. I will use student visa SOP as an example for the formal letter formats.
Header
The header is where you outline the sender and recipient information. You include the company position or title in a business letter, especially when sending it to a business address. The header has the sender details, receiver details, and date. The date should be in the format Month Day, Year.
The sender/receiver details have the following parts:
- Full name
- Title/designation, Company name (optional)
- Line 1 address: number, building name, street
- Line 2 address: other information
- City, Country, Zipcode
You don’t need to add a header to your email since emails often automatically have the header as email sender/receiver information.

However, you supplement the header sender details at the email signature, so ensure you update it from time to time.
Salutations
You will start the letter by addressing the receiver in the salutations, the part where your emails often begin. This two-letter or three-letter phrase may not seem significant, but it’s the very first impression that your recipient will have. Getting it wrong will make you seem unprofessional.
For formal letters, you can do these steps:
- Knowing the receiver’s last name, you can write the salutations as Dear then Mr./Ms./Mrs. with the receiver’s Last Name.
- You can use Dear and then the receiver’s First Name if you know each other in person.
- You may use Dear then Sir or Madam, if you don’t know the receiver’s name.
- If you don’t know the recipient’s name or preferred gender, you may use To whom this may concern.
You can use Hello or Hi if you’re writing casual business or corporate emails. For student visas, you can write Dear Sir/Madam unless you know the gender preference of the examiner. It all depends on how well you know the receiver or how you think the recipient will react to how you address them.
Body
The letter’s body is where you put everything you want to say, and it’s the best place to say something and get your point across. I separated the body into three parts, similar to how you would narrate a story with a beginning, middle and end. The guiding principle is that you don’t want to rush the reader into everything and have a singular purpose for your letter.
There are three parts to your letter’s body:

Introduction
The introduction is the best place to make an impact, and your performance could determine whether the receiver will continue to read your email/letter or not.
People often count the first paragraph as part of the salutations since the first two sentences are often greetings and generic well wishes. You should introduce yourself in the third sentence if you’re talking to someone for the first time. The next part should summarize what your reader will expect from your letter and hint at the desired resolution.
In a Student Visa application, you don’t need to introduce yourself in the first paragraph because you will discuss yourself in the succeeding ones.
Content
The following two to four paragraphs comprise the body’s main point, so you should include everything necessary for the reader in an orderly manner. One of my many services involves writing letters for clients, so I aim to help them create those themselves. You need to organize information in each paragraph for comprehensive formal letters like a Student Visa Statement of Purpose (SOP) or Letter of Intent (LOI). Agencies will often provide you with guide questions you need to answer for the letter.
In a Student Visa SOP, you should spend one paragraph each talking about the following:
- Yourself. Your education and past work experience. Your dreams and future places to prove you will return to your home country.
- Family. Their names, occupations, and businesses/properties. Your past, current, and plans with family to prove home ties.
- Finances. Talking about money is considered rude in a usual setting, but it’s essential for a Student Visa SOP because the embassy needs assurance that you won’t be a burden in your country of choice. Mention your and your family’s savings. If you have sponsors, talk about their financial state.
- Education. Talk about the course and school you chose, why you chose them, and the environment, learnings, and knowledge you anticipate will experience there.
- Country. Cite what you know about the country and how you believe it will benefit your experience.
You may need one or two paragraphs according to your respective embassy requirements.
Conclusion or resolution
The final one or two paragraphs will include a resolution or conclusion, informing the reader what happens after reading the letter or email. Student visa SOPs often promise to be law-abiding visitors or return home after their study duration, and other formal letters or emails may have different endings.
They may contain a combination of the following as they apply:
- Your appreciation and thanks to the receiver for reading your message
- Thanking the reader for the opportunity
- Looking forward to a response from the receiver
- Invitation to contact you for questions or concerns
- Call to action (book a consultation with us or schedule a discovery call)
- Informing what attachments come with the email/letter
Generally, it would help to thank the reader at least once in your closing statements. If you’re applying for a job, thank the person for the opportunity. If you’re asking for a chance or exemption, thank the person for his kind consideration, and tell him you look forward to a response.
Closing and Signatory
You’re finally done with your letter; what’s left is to compose a closing remark and sign it off with your name. You can affix your signature if you want people to know you wrote it yourself, and you can also add your company position and title at the bottom.
Here are some of the best letter closings to use in formal letters:
- Yours truly/Truly yours
- Sincerely yours/Yours sincerely
- Regards/Kind regards/Best regards/Warm regards
- Appreciatively
- Respectfully/Respectfully yours/Yours respectfully
- Faithfully
- Best/All the best
For corporate or informal settings, I use Cheers because I believe it suits my cheerful personality best.
For emails, you can customize an email signature.
Activating Gmail Signature

Emails have the option to attach a signature at the bottom of every email, so you don’t have to keep repeating the same signature each time. You can control signature appearance by adjusting the font size and style and adding images and links. Some people use the signature feature like a calling card to subtly promote the company, a website, or services.
You can activate yours with the following steps:
- When in Gmail, click the cog in the upper-right corner and open “See All Settings”
- Check the Signature feature found in the General tab.
- Click “+ Create new” and make your signature.
- Adjust the signature defaults. You can choose between my signature/no signature for new emails and forward or reply emails.
- Click Save Changes at the bottom part.
Review Your Letter
Finally, please don’t send your email without reviewing it. I can’t stress this enough. I’ve experienced reading emails saying, “I’ve attached X,” with no attachments. It also doesn’t hurt to read everything before sending anything for possible contextual, spelling, or grammatical errors. Since you can’t reverse most emails you send, you need to review them first.
Conclusion
Every freelancer should learn how to write formal letters and emails for better communication. There’s no downside to being able to produce an excellent copy, practice the basics, improve your story-telling skills, and you’ll craft beautiful emails in no time. The free template was a proposal letter sample.
Check my blog to learn more about freelancing and reaching personal goals. Comment requests in the section below if you want me to make more formal letter samples and templates.

Leave a comment